Pixie Drawing
In legends, pixies are legendary animals that have abilities. They are many times portrayed as a winged animal in human structure with an extraordinarily lovely actual appearance. They additionally have highlights that put them aside from people, as pointed ears and webbed fingers. The secret that lies upon the genuine presence of pixies makes them unimaginably fascinating to draw. Pixie Drawing tulip drawing or ther drawing ideas live on our blog.
Luckily, we have organized a bit by bit instructional exercise on the most proficient method to draw a pixie summed up in 9 simple and straightforward advances. You can apply these means whether you need to draw a practical looking pixie or an energized one.
Each step is went with intelligible outlines that act as your visual aide as you adhere to the directions. Whether you are a beginner or a specialist in drawing, we're certain you can follow these means easily. Likewise, you can add your own style and make do in each step.
Go ahead and blend and match tones to alter your fine art and make it exceptional. Allow your creative mind to meander and release your imagination.
Stage 1 - Pixie Drawing
Beginning in your paper, draw an unpredictable circle shape to frame the face. The state of the face should have a more prominent length than width. Then, right under the face, define two bended boundaries for the neck. Stretch out the lines to make the framework of the shoulder the whole way to the arms and hands. The arms ought to be adjusted and drawn uniformly.
Here is a valuable tip: define an even boundary and an upward line across the paper to make reference lines. This will guarantee that your pixie drawing will be situated accurately in the center.
Stage 2 - Draw the Pixie's Chest area
Presently, now is the ideal time to give this pixie a charming top. Define two vertical boundaries, each beginning from the underarm. Then, interface the two stopping points along with an even line at the base. When drawn accurately, it ought to seem to be a trimmed bandeau top.
Stage 3 - Attract a Skirt to Finish the Outfit
Since we have drawn the top, now is the right time to attract the skirt to finish the garments of your pixie drawing.
Beneath the top, draw a skirt with various bends down the trim. Obviously, you can attract the skirt any structure you need to tweak it. You might actually add examples and plans to it to make it more innovative!
Stage 4 - Add a Second Layer to the Skirt
Right under the primary layer of skirt, draw a second layer with the comparative structure. This time, notwithstanding, the subsequent layer should be marginally greater than the first. This will make a slick streaming skirt!
Stage 5 - Then, at that point, Draw the Pixie's Legs
Draw a couple of legs beneath the skirt. Ensure that the legs are adjusted and drawn uniformly.
Stage 6 - Next, Draw the Pixie's Hair
Draw a hairline simply over the temple. Then, draw a wavy strand of hair right down to the pixie's lower back. Make sure to the hair in any style you like! You can cause the pixie to have straight or wavy hair. You could attract the hair a braid or in a bun. It's everything dependent upon you!
Stage 7 - A short time later, Draw the Pixie's Wings
Draw a couple of wings at the rear of the pixie. A pixie's wings are generally gigantic, so ensure that the wings you draw stretches out from the head right down to the legs.
Pixies' wings arrive in a great many shapes and sizes. A few wings are molded like a butterfly's wings, while some are framed like a dragonfly's wings.
Stage 8 - Add Examples on the Wings
Since we have wrapped up drawing the diagram of the wings, the subsequent stage is to plan the wings to make it look much more prettier!
Draw different shapes and examples inside the wings. Let your creative mind and innovativeness start to lead the pack while styling the wings!
Stage 9 - Put a Grin on the Pixie's Face
As may be obvious, we're practically finished! Presently, now is the ideal time to draw the pixie's facial elements to finish the look at last!
Returning to the blueprint of the face, draw a couple of curved eyebrows with two eyes right under. Draw one more little circle inside the eyes and shade the whole eyes while leaving the minuscule circle inside unshaded. Remember to add eyelashes for a more marvelous look!
Then, at that point, at the lower part of the face simply over the jawline, attract a vertical bend to make the pixie appear as though she's blissful and grinning broadly.
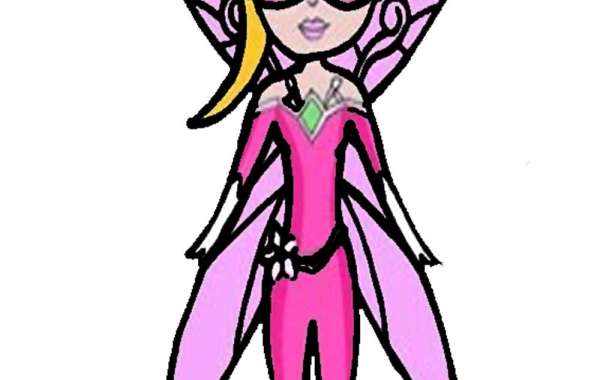
Furthermore, that's it; you have effectively drawn a pixie. Presently, all it's missing is a sprinkle of striking and lively varieties to finish your craftsmanship at last
At last, here is the most astonishing part — filling in the varieties for your great drawing! Here you can flaunt your creative abilities and your capacity to blend and match different varieties.
Pixies are accepted to have green or blue skin. There are additionally contrasts in the shade of their dress. In conventional old stories, pixies are much of the time portrayed wearing green attire. In present day fiction, then again, they normally don pink or purple apparel.
Go ahead and variety your pixie drawing anyway you like and utilize any tones you like! And keeping in mind that you're grinding away, why not take a stab at exploring different avenues regarding different shading materials too?